![[picture from the manufacturer]](hetchHetchy.jpg)
Original tandem. Picture from the manufacturer
There is a known "problematic period" for a cyclist with kids. At age from 6 to 11, they are already too big to fit into the rear seat, but not yet capable of riding along more than several kilometers. This is described very well at "tandems and kids" page by Sheldon Brown. When time came, I faced that problem as well. I started looking for a solution how to cycle with two daughters, who were 2 and 7 at that moment.
There is not much offer from the industry. Solutions are:
I carefully explored all three options.
![[Burley Piccolo]](addBike-burley-Piccolo.jpg)
Piccolo half-cycle by Burley
"Piccolo" by Burley were readily available from Helsinki bike shop Velosport, although the price made me laugh. I was asked 560€, while in the USA it is available at average $350, which at that moment made approx. 280€. I considered ordering a comparable product made by Adams at Harris Cyclery for $160.
But the bad news is that these trailers do not allow riding with two kids at once. Usually their rod attaches to the seatpost, thus making usage of rear child seat impossible. Burley's comes with a special rack, the rod mounts to its center, and this construction is very difficult to modify so that anything else could be put on the rack. When riding with kids, I always carry some luggage, and such complete disabling of the rack seems like an utterly poor design to me.
![[Hoening's, then Roland's Add+Bike]](hoening-addPlusBike.jpg)
Add+Bike from Hoening (later Roland), a superior and cheaper product
Later, when my tandem project was almost finished, I found another trailer called "add+Bike", by that time from German company hoening.com, in 2010 by Roland. It attaches to the very end of the rear rack (included with the trailer), thus allowing the second passenger. Their price is competitive, and the rack could be used as usually! If I had known about it before, I'd probably not have searched for anything else. This product is clearly superior to the american competitor, and as it often happens, loses only on the marketing side.
![[Trail-gator rod]](trail-gator.jpg)
Rod, connecting child's cycle to adult's one
These are the "minimal" solution. Available as order items, one is american-made by www.trail-gator.com, sells for about $90 in the US, the other is from Germany and could be ordered at many German bike shops (give a net search for "tandemstange koala") for about 40 euros.
If they really work, they may beat all other constructions because the child may ride independently unti exortion, and switch to the towing mode afterwards. But again they all are fixing to the seatpost, which leaves the younger child without a vacant place.
![[FollowMe-tandem attachment]](followme-tandem.gif)
Another way to attach the child's bike
In 2007, I found another German invention: FollowMe tandem. The pictures on the site do not show clearly technical details, but this may be something I'd have liked to try.
Leaving Hoening's Add+Bike aside, the only remaining option is an adult tandem. Tandems are fun by itself, although they may be hard to store in a city apartment. Fortunately our house has a special storage for bicycles, as most houses in Finland do. Tandems are also expensive, prices start somewhere at 1500€ plus delivery to Finland. Prices of local distributives are even much above that, while the selection is limited by overpriced Cannondales.
But in 2004 the scandinavian supermarket chain Biltema listed in their catalog tandem for 450 euros. Supermarkets are known for selling bicycles, which are "not intended to be ridden", but Biltema is doing clear positive steps in this area every year. I carefully explored that monster and took a decision to buy it.
![[Version 1, without kidback yet]](tandem2.jpg)
This tandem is just barely acceptable for two full-size adults. I rode it once with my friend who is also a cyclist, and the Nexus hub did not break at once, but I was all the time expecting that it suddenly does.
In fact, most of design decisions of that tandem (not counting the Nexus hub) are very reasonable:
The points below make it what I called "barely acceptable" for a full-strength couple:
As with most department-store bikes, this one was not properly adjusted in the store (in fact it was sold in the cardboard box pre-assembled). I had to do the following small fixes:
Later, more upgrades/adjustments were done:
![[Tandem with kidback, left side]](tandemV2alone.jpg)
View of the complete outcome
Finding the kidback was not an easy task. There are three "mainstream" american manufacturers, Burley, Santana and DaVinciTandems, making full kits. Their products look similarly and the kidback chain runs on the left side, wrapping over included chainring, which attaches to the sync chainring. This would not have worked for me without severe modifications, because left-side cranks had pressed-in chainrings, and there are no holes to bolt the second one. Also sync chainrings are 33T -- too small even to drill these holes in 110mm BCD.
![[Photo]](stokid-burley.jpg)
Kidback set from Burley
Another thing I did not like in these kits was an extremely narrow area where the kidback fixes to the tandem's seat tube. It is about 4cm wide, and I was simply afraid that the frame would be bent, although I have not found reports of such disaster on the net. Burley's version was again in stock at Velosport for 350€ ($180 at Harris Cyclery, which made less than 150€ at that moment).
![[Photo]](stokid-sjs.jpg)
Kidback attachment from SJS Cycles
The best unit for my needs is made by British Saint John's Street Cycles, but they make it only for 28.6mm tubes to fit their own steel tandems and did not show any enthusiasm to make a custom piece with 31.8mm clamp. So I was left with the only possibility to come up with something home-made.
During the summer 2004, one local bike mechanic (let me not name him) was promising me to weld the kidback. He continued to postpone the date, until in September he finally said he can not do it at all. That left us without one summer. I did not expect such kind of service, which is unfortunately common in Russia, here in Finland.
Later, I picked a steel frame at a junk field, sawed out the bottom bracket, and a friend of mine who has access to metal workshop welded it to the tube of proper inner diameter. Short cranks were available in local shops. Originally, I planned to run the kidback chain to the front right crank, as on Sheldon Brown's photo. I'll be free from chainline problems then. But the drawback of this easy setup is that the chain pulls the bottom bracket not parallel to the seat tube, as in the mainstream setup, thus applying torsional stress to the tube. I was uneager to work by trial-and-error with aluminium frame, and in the end managed with the chain running to the right rear crank. Thanks planetar gear - that would not work with a front derailer.
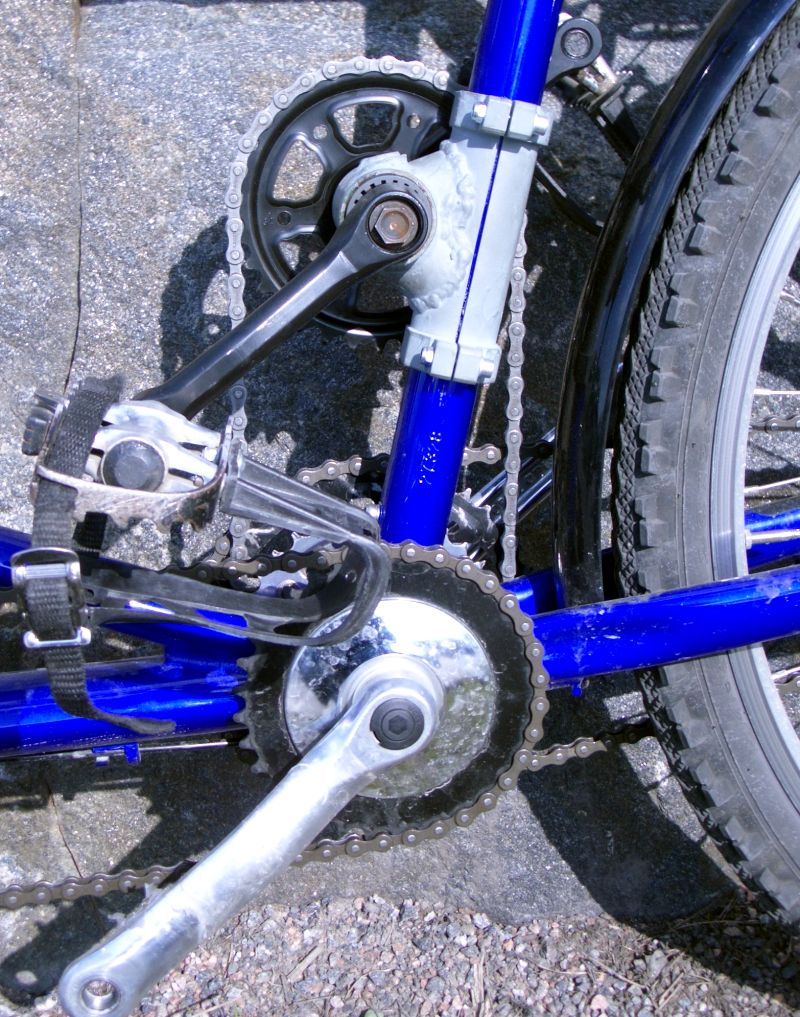
![[Drivetrain, right view]](drivetrainRight.jpg)
The resulting drivetrain
The correct chainline between the kidback and the rear right chainring was essential now, and of course required some tweaking. I had to replace the rear bottom bracket for a shorter one (limited by clearance between the left sync chainring and the chainstay -- now there is about 1mm!).
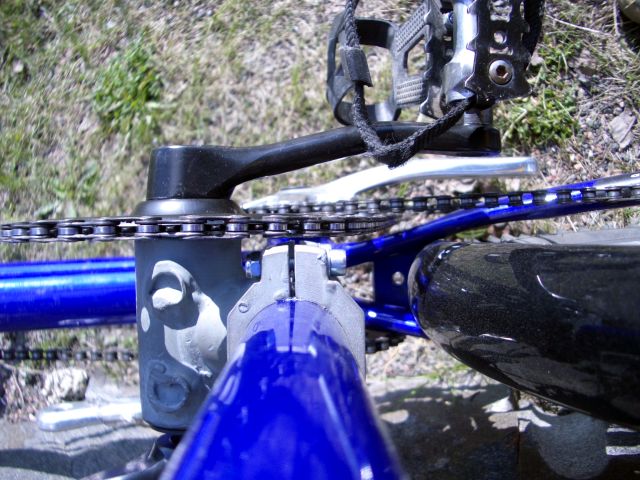
![[Clearance 1mm]](leftClearance.jpg)
Clearance between the rear sync chainring and the chainstay limited the rear bottom bracket length from below
It was not enough, the kidback's chainring was still much closer to the frame, and I did not want to increase kidback's Q-factor. Finally I went by flipping the middle chainring on the old crank, which gave perfect chainline for both main chain and sync chain. I must confess that this successful setup was not the first one I tried.
![[Modifications to the crankset]](rightCrank.jpg)
Right crank with reversed 32T middle chainring

Views of the homemade kidback
First tests showed that the kidback works great. Stoker is proud of being helpful and feels completely engaged in the ride. The tandem quickly became favorite transportation means for the children. When I inform that we are going somewhere by car or bus or train, kids ask in disappointment: "Why not on tandem?..".
![[Version 2, with kidback]](tandem3-m.jpg)
Surprisingly, it turned out that changing to the "adult's" configuration is very easy. It is enough just to move the rear pedals from the kidback down to the "unused" rear cranks. The kidback's cranks are not in the way of the adult's legs. Of course the kidback with cranks and extra sync chain can be taken off when not needed, but I was too lazy to do it. Even during a one week tandem ride with my wife I just swapped the pedals, which takes less than 5 minutes.