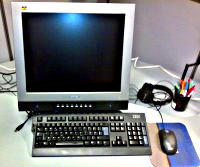
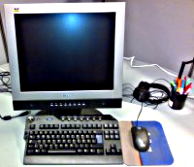
Workplace "before" and "after"
Workplace "before" and "after"
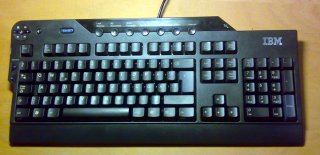
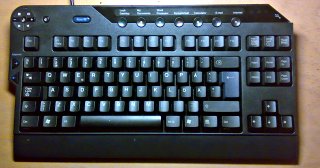
All keyboards I had came with a numeric keypad on the right.
I never use it.
It takes desktop space, which is a valuable thing. Even more important, it takes the space where I'd like to have the mouse. Numeric keypad shifts the mouspad about one palm further to the right, which I find counter-ergonomic.
 I was looking for a keyboard without the right pad
and at some moment found one model at a local computer supermarket.
It's price was about 4 times higher than of ordinary keyboards, and
it'd have been one more piece of plastic bought (I'm careful about
not increasing the amount of waste without reason). When I finally
decided to go for it, it was gone.
I was looking for a keyboard without the right pad
and at some moment found one model at a local computer supermarket.
It's price was about 4 times higher than of ordinary keyboards, and
it'd have been one more piece of plastic bought (I'm careful about
not increasing the amount of waste without reason). When I finally
decided to go for it, it was gone.
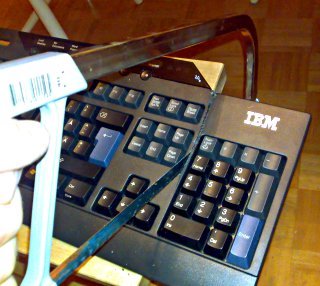
But here is a regular keyboard, and here is the hacksaw. How hard can it be?
 That's what it looked like. The numeric keypad is just asking to
be chopped away. But you can't "just do it" straight away: there
are circuit layers inside, which should not be broken. Otherwise
some keys stop working - or maybe just everything stops. First, the
keyboard has to be disassembled.
That's what it looked like. The numeric keypad is just asking to
be chopped away. But you can't "just do it" straight away: there
are circuit layers inside, which should not be broken. Otherwise
some keys stop working - or maybe just everything stops. First, the
keyboard has to be disassembled.
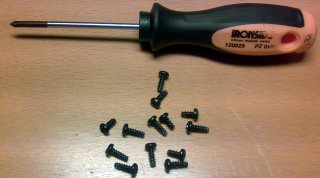 How many screws do you need to keep together two halves of a plastic box?
Two? Or maybe four? IBM designers used 13. And that's just for opening
the case; inside, the main innards are hold by 14 more.
How many screws do you need to keep together two halves of a plastic box?
Two? Or maybe four? IBM designers used 13. And that's just for opening
the case; inside, the main innards are hold by 14 more.
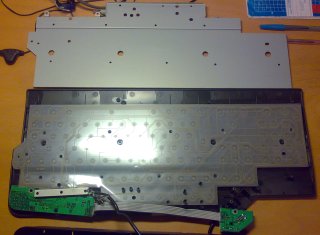 Finally everything what can be detached is lying separately. That is,
metal base and two mylar layers which actually make contacts. The latter
should not be cut, everything else should.
Finally everything what can be detached is lying separately. That is,
metal base and two mylar layers which actually make contacts. The latter
should not be cut, everything else should.
 This is the point of no return! Sawing plastic is easy. Metal base
is more difficult, but still it's a minute job.
This is the point of no return! Sawing plastic is easy. Metal base
is more difficult, but still it's a minute job.
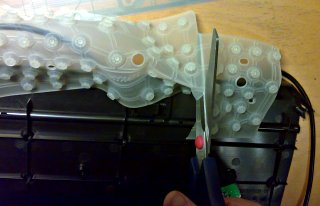 The rubber sheet with buttons, which actually return the keys up,
can be cut just with scissors.
The rubber sheet with buttons, which actually return the keys up,
can be cut just with scissors.
 Almost the final result. Flexible printed cirquits stick out from
freshly-made cut.
Almost the final result. Flexible printed cirquits stick out from
freshly-made cut.
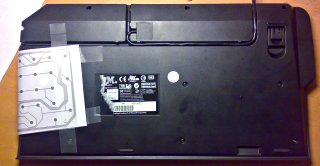 Probably they could be hidden inside the case. But I was so impatient
to try whether the modification actually works that instead of hiding
gust taped the two layers to the back side of the case.
Probably they could be hidden inside the case. But I was so impatient
to try whether the modification actually works that instead of hiding
gust taped the two layers to the back side of the case.
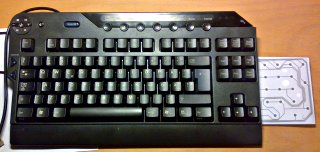
 That's it, meaning, extra space for the right hand! Everything works
(I expected it, but you know, it's always some uncertainty...).
The edge is not noticeable; I rounded the plastic with a file just
a bit, but you never touch this place anyway.
That's it, meaning, extra space for the right hand! Everything works
(I expected it, but you know, it's always some uncertainty...).
The edge is not noticeable; I rounded the plastic with a file just
a bit, but you never touch this place anyway.
The work took about two hours from start to end. Of course you need minimal accuracy, but in this case really minimal is enough. I was not the first one in the rank when it came to making real things by hands.
If you decide to repeat this exploit, check first if your keyboard has LED indicators (such as Caps Lock) above the keypad. If it does, then you are likely out of luck. Leds are most likely mounted on a printed circuit board which extends over all the keyboard length, and it can't be chopped off easily.
What a pity that I can't patent this genious invention! My later research in ancient history revealed that in the dark past, Trevor Blackwell did just the same with a "Microsoft natural keyboard".